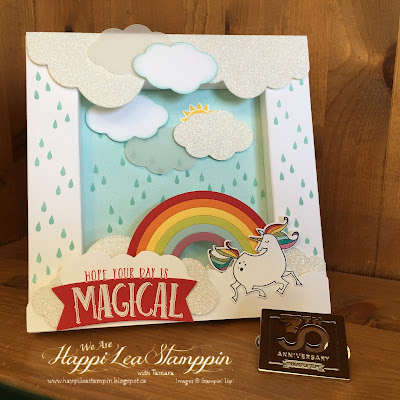
I am having such a great time making these shadow box frames! I finally did one of my own designs! I guess it's my second design, first using a current bundle 😉 I've said it once, and I'll say it again... I can definitely see me making more of these. They would make a great gift for a friends, family or co-workers.
 Fold all your score lines and your ready to put it together! I'll do my best to properly describe how to put it together. I Suggest Doing These Following Steps in a Dry Run First!
Start with the sides that are all one length (top & bottom of diagram, putting it together without adhesive first will make everything make a bit more sense)
Fold all your score lines and your ready to put it together! I'll do my best to properly describe how to put it together. I Suggest Doing These Following Steps in a Dry Run First!
Start with the sides that are all one length (top & bottom of diagram, putting it together without adhesive first will make everything make a bit more sense)
You can see the side that needs to be glued down when you have it together without adhesive, so use a strong adhesive on that side. Fold that section right over, then fold at the 3rd section and it should fold up forming the box perfectly. Once you have both the top and bottom sections done, then you can do the angled sections (the ones on the sides of the diagram)
Once you have all 4 sides adhered down, we have to get those corners secured. I use glue dots and a Paper Piercing Tool to do this. Pick up a glue dot with the piercing tool and just tuck it under the corner, you may have to just sneek your piercer in the corner and push to get that dot stuck. Do that for all 4 corners and your done!
If you are going to decorate an inside piece, make sure you do that before you glue the sides of your box if you don't want a border.
I hope my instructions were clear enough for you to create a Shadow Box Frame of your own!
Product List

To make the frame is really easy, I have only used 12 x 12 sheets so far but it would depend on how big you want your window to be. I did this one with a 12 x 12 sheet and scored at 1" 1.5" 3" and 3.5" on all 4 sides. This gave me a 1" border all the way around and just 1/2" dimension. If you wanted a higher dimension, you would score at 1" all the way around, which would make the window a bit smaller as well.
Once all 4 sides are scored, with the top make an additional score line at 4" & 8" but only to the second score line down. Then do the opposite side the same way. Should look like the sides on this template. Then where you see all the scribbles, cut those off.
 Fold all your score lines and your ready to put it together! I'll do my best to properly describe how to put it together. I Suggest Doing These Following Steps in a Dry Run First!
You can see the side that needs to be glued down when you have it together without adhesive, so use a strong adhesive on that side. Fold that section right over, then fold at the 3rd section and it should fold up forming the box perfectly. Once you have both the top and bottom sections done, then you can do the angled sections (the ones on the sides of the diagram)
Once you have all 4 sides adhered down, we have to get those corners secured. I use glue dots and a Paper Piercing Tool to do this. Pick up a glue dot with the piercing tool and just tuck it under the corner, you may have to just sneek your piercer in the corner and push to get that dot stuck. Do that for all 4 corners and your done!
If you are going to decorate an inside piece, make sure you do that before you glue the sides of your box if you don't want a border.
I hope my instructions were clear enough for you to create a Shadow Box Frame of your own!
😊Happy Crafting😊


Comments
Post a Comment