I am first going to apologize to all of you who actually follow my blog and watch for the things I make! I can't believe it has been over a month since I have had a chance to post!! 😬 It has been a little crazy, I'm sure some of you can relate... I hope!
I have managed to get in here and get a few projects done over that past few weeks... I pretty much only get in here on weekends so I don't get too much done, but some 😃 I sure hope I can get everything I want done finished before Christmas is actually here! I finally got my tree up just the other day... No ornaments yet but the tree is up 😂
 So I guess the first thing I haven't posted in a while is the box I made to house the little 3D ornament I made and decided to give away. I was pretty happy about the winner, it was my Boss 😉 and she was pretty excited about winning it as well!
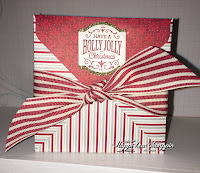
 I also did another one for my Daughter to give one away at her Christmas Party. I did hers a little different as it needed to be fully wrapped.
It must have been a real hit because she had a request for 3 more from other co-workers! I wasn't even sure anyone would like it as it is a seasonal item and hand made. Well, girls like that stuff better so thank goodness she picked a girl and not a guy 😂
 I also decorated a cover for the album I had done a while ago, I kept opening it at the back so bit the bullet and decorated a cover. It might be a bit busy for some but I am really happy with how it tuned out and love the versatility of the November Special items! So glad I got them all!!
I made another pocket on the front with an insert and just decorated up the pocket piece mostly, I did put a little something on the insert so you don't HAVE to put a photo on it if you don't want. It can be left just like that or with a photo, will look great either way!
I love making different wreaths at Christmas time and had come across the Paper Cone ones a long time ago on pinterest and always wanted to try one. You can find all kinds of instructional videos on YouTube if you search Paper Cone Wreath. I had seen the one I cased mine from and that was the one I was doing. It is absolutely Beautiful! I will most definitely be doing more of those ones for sure. They are so much easier and quicker to finish than the curled strips of DSP ones!!
 I decided to give it away at my Christmas Party so I wanted something to wrap it in so it wouldn't get wrecked. Doing all these cool projects with the chipboard we get with Stampin' Up! products, I decided to make a box for it. That way, there is somewhere to store it during the off season as well!
I also am loving making the rosettes and wanted to do something to match the center of the wreath for the tree or just as a decoration so I made the tag a bit bigger to use as just that.
 I had some ribbon that was wrapped around a pair of Pajamas and I had saved it to use on something and this was the perfect project. It was 2 pieces so I just timed them in knots to look like a bow and it think it looks pretty good. Tied the ornament/tag just in a bow so you didn't have to cut and could do anything you wanted with it!
 The box I just cut to fit the wreath, good thing it wasn't any bigger cause it wouldn't have worked then! The chipboard is only slightly bigger that 12 x 12 so you have to consider that in your project ideas. Anyway... I cut it to size and used the tombo liquid glue to glue the edges together just enough to stay together till I got the Hockey Tape around the edges. I 💕 the look and it hides the edges and holds together so well. It is my new favorite adhesive for making sturdier boxes. You can see a little betting in the picture I took of the corner of the box, the top is slightly shorter than the inside. It was really beautiful, wish I could have kept it 😉
 For the rosette, I had to use 2 pieces of DSP and keeping it at 12" in length, you cut the strip to the width of half the size you want the ornament to be in diameter. I believe mine was roughly 6" across so the 2 pieces were cut to 3" x 12" and scored every 1/4". Using a circle, that is big enough to hold it but smaller that the rosette you can either punch it out of some scrap paper or use something to trace it if you don't have something big enough to punch or die cut and just Hot Glue to the back to keep it together and be strong enought to hold everything. I also used hot glue to hold the glimmer piece on a well.
 Then I had seen and ornament done like this one but with sealer jar lids. I wish I could remember where I had seen it so I could link you to it. Mine is exactly like hers but with Frozen Juice Can lids instead of jar lids. I may try the sealer jar lids one day but as of yet, I still get tons of these cause my kid still likes frozen juice sometimes. I'm not much of a caner so I don't have many lids and I didn't want to go buy anything... recycle what I have 😉😊
I used the Dashing Deer bundle which I had to borrow cause I didn't buy it... until I made these. Now I own it as well. Also the Merry Christmas to All Bundle and the dies from the Eastern Medallion framelits. I created a Doily type thing and then punched it out in the 2 1/2" punch which is now retired. There is a die that is roughly the same size I believe but the punch is the perfect size.
And lastly my November Group projects!
 I saw a video on YouTube with a bunch of different colors of backgrounds done like this, see the video HERE with all the different color backgrounds. I picked the Purples because it was easiest as she named the colors she used and I really haven't done much in purple and I am really liking the purples this year. I did change up the Stamp Set to the Spirited Snowmen instead of using the Snow is Glistening set and Snowfall Framelits. When I saw that background, the Spirited Snowmen came to me and is perfect. I also added a moon for a little something extra.

I finally did a project with the Gable Boxes! Really simple and cute and I am still loving the rosettes! As you can see, I found one to look awesome on the box. I did use the Snowfall Thinlit Dies and the Candy Cane Season bundle for this project. such a simple project but so fun to make! The rosette is a 1 1/2" x 12" scored every 1/4" a snowflake from the Snowfall Dies and the kissing candy canes from the Candy Cane Season stamp set and fussy cut out. There is a matching punch but it is for the larger candy cane in the stamp set.
Unfortunately the DSP I used for around the box is already no longer available! It has already sold out 😔 It is the Santa's Workshop Specialty DSP that co-ordinates with the Signs of Santa Bundle I used on the Ornament box my Daughter gave for her Christmas Party. More that half of the sheets have flocking on them, a velvety feel to the paper. Just gorgeous!! I am so glad I have the 2 packages I do have!!
I have managed to get in here and get a few projects done over that past few weeks... I pretty much only get in here on weekends so I don't get too much done, but some 😃 I sure hope I can get everything I want done finished before Christmas is actually here! I finally got my tree up just the other day... No ornaments yet but the tree is up 😂
 So I guess the first thing I haven't posted in a while is the box I made to house the little 3D ornament I made and decided to give away. I was pretty happy about the winner, it was my Boss 😉 and she was pretty excited about winning it as well!
 I also did another one for my Daughter to give one away at her Christmas Party. I did hers a little different as it needed to be fully wrapped.
It must have been a real hit because she had a request for 3 more from other co-workers! I wasn't even sure anyone would like it as it is a seasonal item and hand made. Well, girls like that stuff better so thank goodness she picked a girl and not a guy 😂
 I also decorated a cover for the album I had done a while ago, I kept opening it at the back so bit the bullet and decorated a cover. It might be a bit busy for some but I am really happy with how it tuned out and love the versatility of the November Special items! So glad I got them all!!
I made another pocket on the front with an insert and just decorated up the pocket piece mostly, I did put a little something on the insert so you don't HAVE to put a photo on it if you don't want. It can be left just like that or with a photo, will look great either way!
I love making different wreaths at Christmas time and had come across the Paper Cone ones a long time ago on pinterest and always wanted to try one. You can find all kinds of instructional videos on YouTube if you search Paper Cone Wreath. I had seen the one I cased mine from and that was the one I was doing. It is absolutely Beautiful! I will most definitely be doing more of those ones for sure. They are so much easier and quicker to finish than the curled strips of DSP ones!!

I also am loving making the rosettes and wanted to do something to match the center of the wreath for the tree or just as a decoration so I made the tag a bit bigger to use as just that.
 I had some ribbon that was wrapped around a pair of Pajamas and I had saved it to use on something and this was the perfect project. It was 2 pieces so I just timed them in knots to look like a bow and it think it looks pretty good. Tied the ornament/tag just in a bow so you didn't have to cut and could do anything you wanted with it!
 The box I just cut to fit the wreath, good thing it wasn't any bigger cause it wouldn't have worked then! The chipboard is only slightly bigger that 12 x 12 so you have to consider that in your project ideas. Anyway... I cut it to size and used the tombo liquid glue to glue the edges together just enough to stay together till I got the Hockey Tape around the edges. I 💕 the look and it hides the edges and holds together so well. It is my new favorite adhesive for making sturdier boxes. You can see a little betting in the picture I took of the corner of the box, the top is slightly shorter than the inside. It was really beautiful, wish I could have kept it 😉
 For the rosette, I had to use 2 pieces of DSP and keeping it at 12" in length, you cut the strip to the width of half the size you want the ornament to be in diameter. I believe mine was roughly 6" across so the 2 pieces were cut to 3" x 12" and scored every 1/4". Using a circle, that is big enough to hold it but smaller that the rosette you can either punch it out of some scrap paper or use something to trace it if you don't have something big enough to punch or die cut and just Hot Glue to the back to keep it together and be strong enought to hold everything. I also used hot glue to hold the glimmer piece on a well.
 Then I had seen and ornament done like this one but with sealer jar lids. I wish I could remember where I had seen it so I could link you to it. Mine is exactly like hers but with Frozen Juice Can lids instead of jar lids. I may try the sealer jar lids one day but as of yet, I still get tons of these cause my kid still likes frozen juice sometimes. I'm not much of a caner so I don't have many lids and I didn't want to go buy anything... recycle what I have 😉😊
I used the Dashing Deer bundle which I had to borrow cause I didn't buy it... until I made these. Now I own it as well. Also the Merry Christmas to All Bundle and the dies from the Eastern Medallion framelits. I created a Doily type thing and then punched it out in the 2 1/2" punch which is now retired. There is a die that is roughly the same size I believe but the punch is the perfect size.
And lastly my November Group projects!
 I saw a video on YouTube with a bunch of different colors of backgrounds done like this, see the video HERE with all the different color backgrounds. I picked the Purples because it was easiest as she named the colors she used and I really haven't done much in purple and I am really liking the purples this year. I did change up the Stamp Set to the Spirited Snowmen instead of using the Snow is Glistening set and Snowfall Framelits. When I saw that background, the Spirited Snowmen came to me and is perfect. I also added a moon for a little something extra.
I finally did a project with the Gable Boxes! Really simple and cute and I am still loving the rosettes! As you can see, I found one to look awesome on the box. I did use the Snowfall Thinlit Dies and the Candy Cane Season bundle for this project. such a simple project but so fun to make! The rosette is a 1 1/2" x 12" scored every 1/4" a snowflake from the Snowfall Dies and the kissing candy canes from the Candy Cane Season stamp set and fussy cut out. There is a matching punch but it is for the larger candy cane in the stamp set.
Unfortunately the DSP I used for around the box is already no longer available! It has already sold out 😔 It is the Santa's Workshop Specialty DSP that co-ordinates with the Signs of Santa Bundle I used on the Ornament box my Daughter gave for her Christmas Party. More that half of the sheets have flocking on them, a velvety feel to the paper. Just gorgeous!! I am so glad I have the 2 packages I do have!!
Comments
Post a Comment