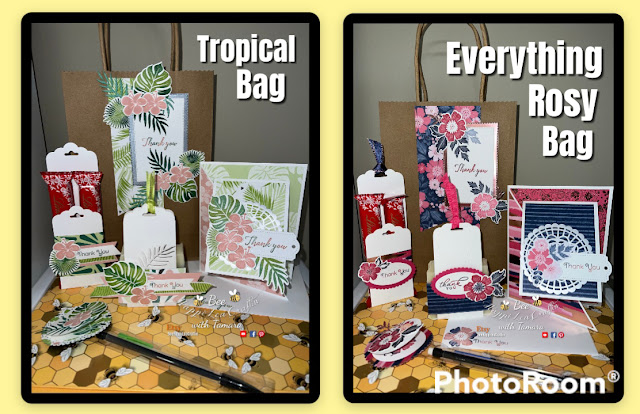
I am so excited about the Folio Class I am doing on the 12th of this month (March), I have 9 signed up to take it! I wanted to give them a little something to say Thank You for attending and supporting me!!
Below is a photo of the 2 bags I did up and the items I filled it with.
Between the 2 bags I die cut more than 250 pieces, plus the punching and straight cutting for the cards and tags. It sounds crazy when you say it like that but it was over a few days and I had so much fun doing it! I think I might make up a few bags for the Craft Fair my friend and I are going to do this coming season. She is the one that makes Cecile's Soaps.
Here is a look at the Tropical Escape bag, I did 6 of this one and 4 of the Everything Is Rosy one. Items inside are pretty much all the same (as you can see in the photo above), just decorated a little different.
This bag is decorated with the Tropical Escape Suite (Blushing Bride, Granny Apple Green & Shaded Spruce) but I used a few other products in the process as well.
- Timeless Tropical Stamp Set (Thank You stamp only)
- Brushed Silver Card Stock
- Blushing Bride Card Stock
- Rectangle Stitched Dies
- Layering Circle Dies
- Taylor Made Tags Dies
- Scalloped Tag Toper Punch
- 1 3/4" Circle Punch
- Pearlized Doilies
- 1" x 8" Cellophane Bags
I have been asked how I achieved the Ombre look on most of the leaves... It is super easy!! Stamp first in the lightest color then with a sponge dauber, sponge where you want it darker. Super cool and super easy!! 😉
Goodie Bag Tag
Banner Tag - Cut DSP to 3" x 6" and
flag the bottom
Silver Rectangle - 2 ½” x 4”
Layered White Rectangle - 2 ¼” x 3 ¾”
(here is where I used the Rectangle Stitched Dies)
Decorate as desired with whatever DSP you are
using for your gift bag 😊
Diagonal Joy Card
Card Base - 5 ½” x 8 ½”; score the 8 ½” side
at 4 ¼”
Cut from the top
score line down to the opposite bottom corner
Centre
Piece - 3” x 8”; score the 8” side at 4”
When attaching
this after you put down the DSP, put it a little higher than center.
*
To cut the angle DSP piece, cut a piece 4” x 5 ¼” and angle cut from Top Left
to Bottom Right.
*
The Thank You tag is cut using the Stampin’ Up! Taylor Made Tags Dies
Soap Wrap
Tag - 2” x 11”; score the 10” side at 4 ½”
& 5 ½” Use a Stampin’ Up! Tag Punch and punch both
ends
DSP Tag Wrap - 1 ½” x 8 ¼””; score the 8” side
at 1 ¾”, 2 ¾”, 5 ½” & 6 ½”
I used some scraps I had to make my
own little Thank You Tag.
Chocolate Bar
Wrap
Tag - 2” x 11”; Score the 11” side at 6 ½”
& 7”
Use a Stampin’ Up! Tag Punch and punched both
ends
DSP Tag Wrap - 2” x 6”; score the 6” side at 1
½”, 2”, 4” & 4 ½”
I just used some scraps I had to make my own
little Thank You Tag.
Pencil Topper
The pencil is in a Stampin’ Up! 1" x 8"
Cellophane Bag
I used
the desired Layering Circle Dies & a Punch to make the topper. The DSP circle is cut with a Scallop Circle
Die and the white piece is folded and punched leaving a little
space at the fold so it will fold over.
Thank you so much for checking out my blog! 💖 If you have any questions about any of the projects above, please don't hesitate to ask!


Comments
Post a Comment