I have had the Copper Tea Tins for a while... I think I got them shorty after the 2018-2019 come out and I am just finally getting around to using them! But boy, now that I have... I will be getting more to decorate! They look amazing all decorated with different suites.
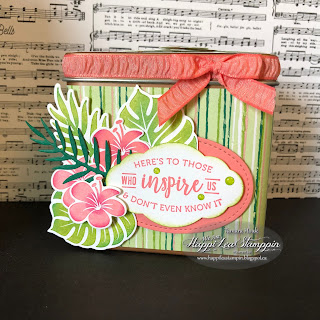 I just love the bright colors in this DSP although I do use a different pink that is in the DSP... I use Flirty Flamingo if there isn't a lot of the pink showing but the right color to use is Blushing Bride.
I was supposed to come to my Office (Craft Room) and get what I needed for my Income Tax but as you can see... I got distracted! That happens pretty easy in here 😂 I had just seen so many on Pinterest lately and I got inspired!
If you are wanting to decorate any, I suggest that you cut your DSP to 3" wide and leave under the lid with no paper. The first one I did I left a 1/4" gap and the lid just sits on top. If you cut your paper that is going around it to 3" it gives you a very small border which looks perfect.
 When decorating the lid, I cut the DSP to 2 1/8" x 3 5/8" and used the Detailed Trio Punch to round the corners. That also gives you a very small border... almost none but enough to see.
I just cut a few more die cuts to decorate the top, arranged them and tacked them with Glue Dots and then used Dinensionals to give them a little lift!
Using the 6" x 6" DSP I thought might be interesting but I picked the perfect pattern! You can't see AT ALL where it joins or where it ends off! I cut the DSP in half and just used a piece of Tear and Tape right along the edge where I wanted to join them. Using the guide on the Grid Paper to keep it straight is a good idea.
If you cut the DSP to 11 1/2" that should give you a 1/4" overlap when you wrap it around. I used the Tear and Tape and went along all the edges and a strip in the center then start at the seem on the tin and tuck the DSP up to it close and just worked the paper tight all the way around.

Product List


I was supposed to come to my Office (Craft Room) and get what I needed for my Income Tax but as you can see... I got distracted! That happens pretty easy in here 😂 I had just seen so many on Pinterest lately and I got inspired!
If you are wanting to decorate any, I suggest that you cut your DSP to 3" wide and leave under the lid with no paper. The first one I did I left a 1/4" gap and the lid just sits on top. If you cut your paper that is going around it to 3" it gives you a very small border which looks perfect.

I just cut a few more die cuts to decorate the top, arranged them and tacked them with Glue Dots and then used Dinensionals to give them a little lift!
Using the 6" x 6" DSP I thought might be interesting but I picked the perfect pattern! You can't see AT ALL where it joins or where it ends off! I cut the DSP in half and just used a piece of Tear and Tape right along the edge where I wanted to join them. Using the guide on the Grid Paper to keep it straight is a good idea.
If you cut the DSP to 11 1/2" that should give you a 1/4" overlap when you wrap it around. I used the Tear and Tape and went along all the edges and a strip in the center then start at the seem on the tin and tuck the DSP up to it close and just worked the paper tight all the way around.

Product List


Flirty Flamingo 3/8" (1 Cm) Ruched Ribbon
[141426]
$10.75


Glitter & Clear Epoxy Shapes
[145632]
$9.25

Comments
Post a Comment